Feeling a Little Blue

Shot of the Month – February 2022

If you have any nature photographer friends you may have heard them talk wistfully about the “Golden Hour.” It is that special time of day just after sunrise or just before sunset when the light takes on magical hues of red, orange, or yellow and has a certain softness that seems to gently caress whatever it falls upon.  During “Magic Hour” the sun is low in the sky, only a few degrees from the horizon.

The lesser-known cousin of Golden Hour is Blue Hour.  I kid you not – it really is a thing.  To explain it I have to get a bit astronomical-like, so strap in.  And, uh, bring along your protractor…

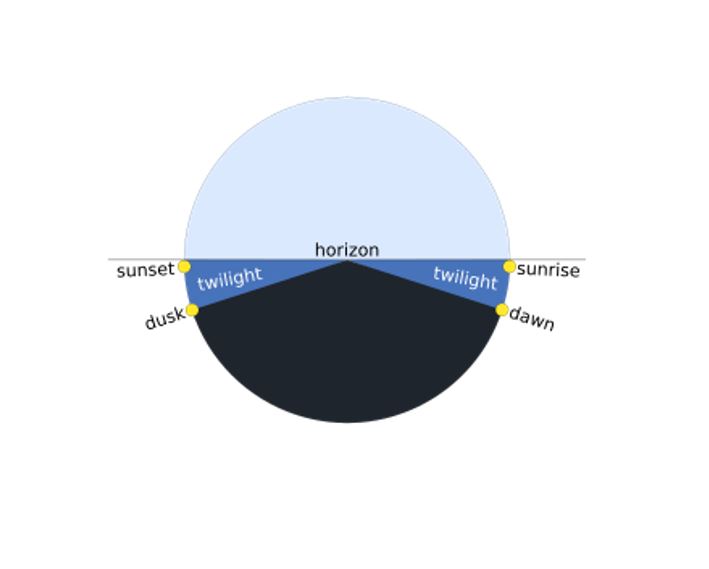
At its simplest, Blue Hour takes place during twilight.  I have heard this term my whole life but what exactly does it mean??

Twilight is the time between day and night when there is light outside, but the sun is below the horizon.  During this period the light we see does not come directly from the sun but rather is scattered and refracted from the upper atmosphere down to our eyes.


Now for the more complicated version.  Time to break out those protractors (And see, you thought that box in your attic from 3rd grade wouldn’t come in handy.  Tsk. Tsk.)

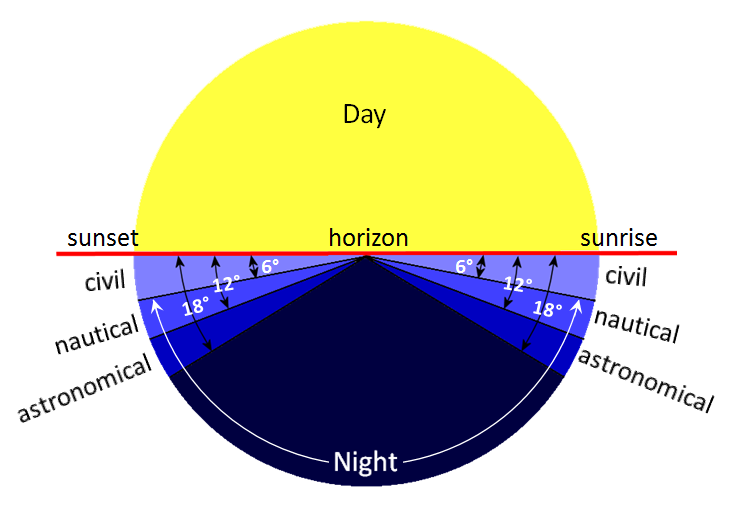
Astronomers were not satisfied with just one “twilight” and created a more precise delineation as shown here:


Let’s break it down.

Astronomical Twilight: The sun is located 12 to 18 degrees below the horizon.  In astronomical twilight, sky illumination is so faint that most casual observers would regard the sky as fully dark, especially under urban or suburban light pollution.  During astronomical twilight, the horizon is not discernible, and moderately faint stars or planets can be observed with the naked eye under a non-light-polluted sky.  In the evening, when the sun is at 18 degrees below the horizon we have Dusk, the end of twilight, and the beginning of full evening darkness.  In the morning, when the sun is 18 degrees below the horizon, we have Dawn, marking the end of full darkness as we begin the morning twilight.

Nautical Twilight: The sun is 6 to 12 degrees below the horizon.  In general, the term nautical twilight refers to sailors being able to take reliable readings via well-known stars because the horizon is still visible, even under moonless conditions.

Civil Twilight:  The sun is located less than 6 degrees below the horizon.  Civil twilight is the period when enough natural light remains that artificial light is not (usually) needed.

Still with me?  You are probably thinking – “Ok Galileo, this is all mildly (barely) interesting, but where the heck does Blue Hour fit in all this?”

Here ya go:

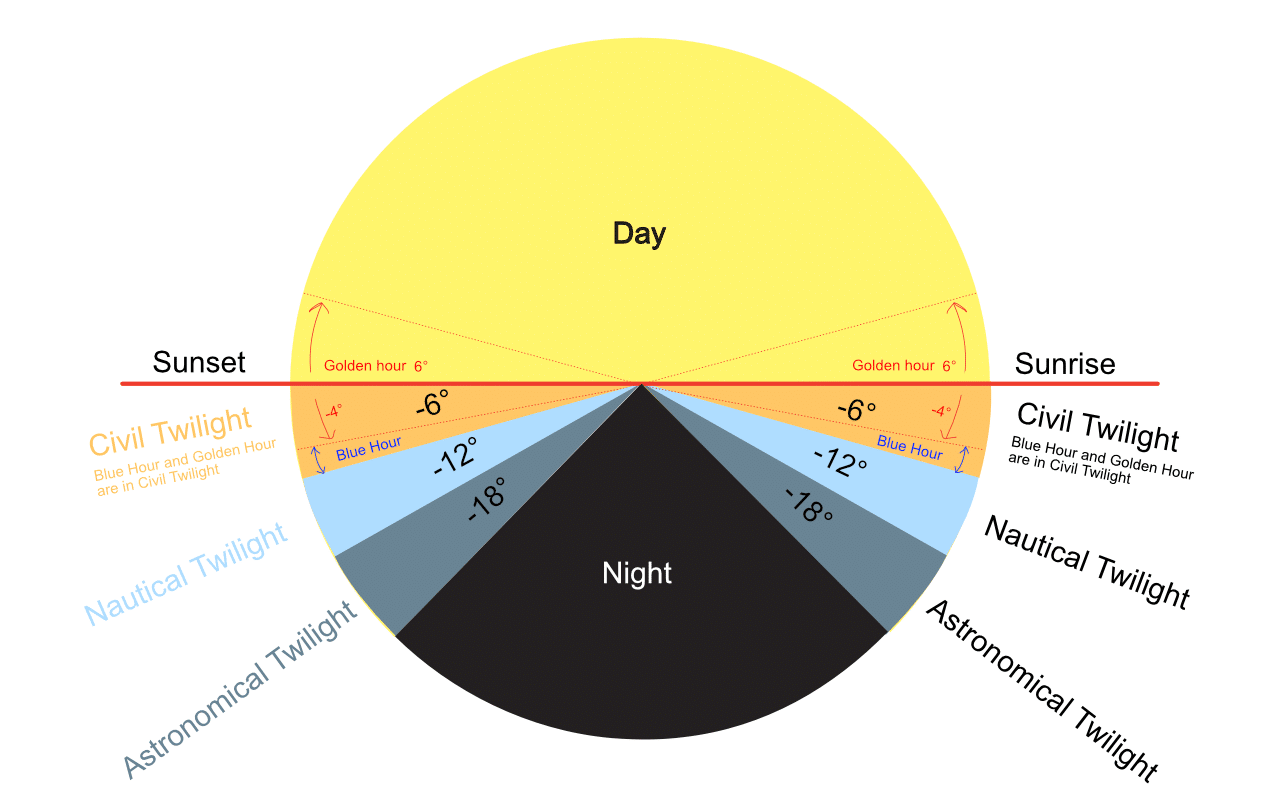
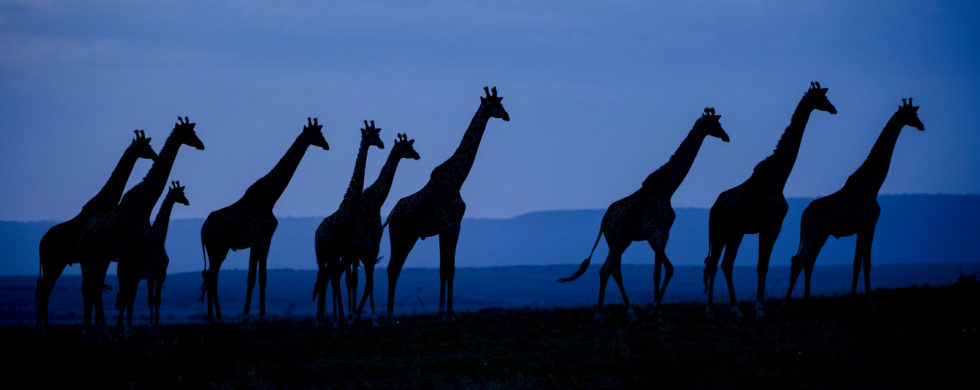
Blue Hour takes place when the sun is between 4 to 6 degrees below the horizon which is usually about 30-40 minutes after sunset/before sunrise.  During this period the light takes on deep shades of blue and can produce unique images.  Truth be told the Blue Hour really only lasts about 20 minutes but the duration varies by where you are on the planet.

I like this graphic also (some may find this one clearer):

(Did you notice “Gloaming” in the graphic above?  It is just an Old English/Scottish term for twilight)

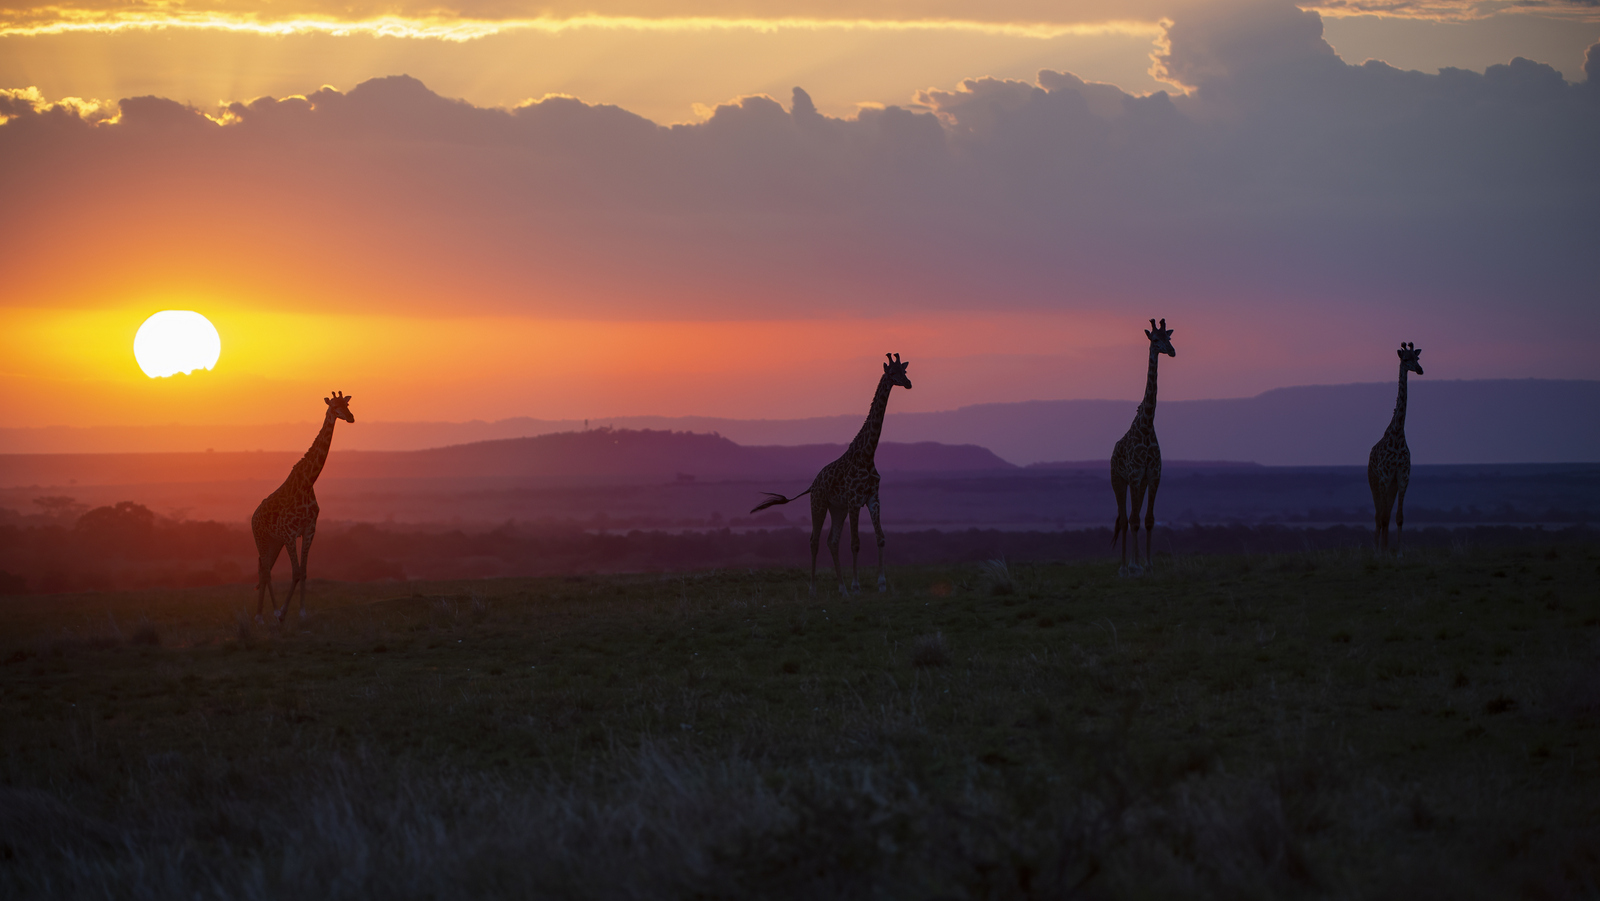
So that was a lot of blah blah to talk about the Blue Hour — more importantly, here is some of the magic it can work:

Blue Hour Giraffes, Masai Mara NR, Kenya (8929)

In this image we have a herd of giraffes strolling by shortly after the sun has set on the Serengeti plains of Africa (Masia Mara National Reserve in Kenya, to be precise).

Here is what the scene looked like while the sun was still above the horizon (late golden hour):


So, if you want to get your blue on you have to get out there waay early or stick around waay late, and then you have to work fast because blue time flies especially fast.


Now, don’t be blue, but we have reached the twilight of this post.


Until next month…..michael


Sources:

Weather.com

Wikipedia

Blue Hour

Lightartacademy

Different types of Twilight

Mr. Reid.org (dawn-dusk-sunrise-sunset-and twilight)


Nikon D4S, Nikon 200-400mm, f/4, 1/400 sec, ISO 2000, -0.5 EV

Pull Back!

Shot of the Month – January 2022

Moose, Grand Teton NP (9346)

Many photographers love to “fill the frame” when they photograph wildlife.  Many spend a tremendous amount of time, energy, and money to have the skills, equipment, and opportunities (photo tours) to allow them to get close to wildlife and capture an image that is filled from top-to-bottom, side-to-side with that fuzzy/furry/scaly natural wonder.  Photographers will spend thousands of dollars for the largest lenses to give them the extra reach to magnify their subject.

Yep, all sounds pretty familiar – you can lock me up for this also – guilty as charged.

Our offense is understandable – we love wildlife and such images allow us to see details that one can rarely see with the naked eye.  Such close-ups allow us to revel in the beauty of our subjects.

The downside is that you can go online and find thousands, and then many more thousands of images that look more or less the same.

To avoid this common mistake and get beyond the simple “animal portrait” when shooting I push myself to try and get at least 3 shots with different levels of zoom on the subject.  And if I have even more time I rotate the camera 90 degrees and take another 3 shots with different levels of magnification.  This can be achieved by either moving yourself (those boots were meant for walkin) or by using a zoom lens that can change focal length.

By pulling back I can place the animal in its environment or habitat and tell a more complete story about its life.  For example, in the image above I purposely did not zoom in to allow the viewer to see this brutal, albeit beautiful, winter landscape, because it is as important to the story as is the moose.   The wider view gives a sense of what life is like for a moose in the winter in the Grand Teton National Park (GTNP) in Wyoming.

Looking at that scene I can’t help but get a shiver down my spine.

Here is another one of my favorite images – by pulling back we see not only a magnificent bull moose but we also get to revel in the colorful bounty of fall in the GTNP.

Moose, Grand Teton NP (1666)

I rarely share images of moose without antlers (cows, young males, post-rut males) as they usually are not as photographically interesting.  In the image below however, the landscape adds so much to the story it becomes a keeper.

Moose, Grand Teton NP (3561)

So, don’t get me wrong, I love me a great close-up portrait.  My point is ok, once you get that shot, now keep going and explore what other stories can be told.  The “environmental portrait” is a wonderful way to broaden and deepen the story and connect the viewer to not only the animal but also to the place they call home.


Until next month….m


Nikon D5, Nikon 70-200 mm f/2.8 (@105 mm), f/5.6, 1/180 sec, ISO 140, EV +1.0

10 for 21

Time to look back at 2021 with a collection of images that summarize my year of photography.   This year I will post them in chronological order.  (Click on an image to see it larger)

1.  In January I had been tracking the weather forecasts for the Painted Hills in Oregon and when I saw a chance of snow I hopped in the car and drove 7 hours to reach the site.  Alas, no snow to highlight these colorful peaks but the clouds and dark sky really helped make the photo.  I drove back the next night (this location is best shot at sunset) through treacherous fog, and snow –  sometimes going 10 miles/hour or less for long periods of time on winding mountain roads.  Ugh — brutal but at least I was rewarded with a nice image for my efforts.

Painted Hills, Oregon (0035)

2.   In May I escaped to San Juan Island in Washington State for a week to photograph foxes.  Here we see a lovely female red fox (Silver Morph) with one of her pups.

Red Fox with pup, Washington (8773)

3.  Each year from mid-May to early July bald eagles congregate at Hood Canal in Washington to feast on spawning midshipman fish.  I made a few visits and captured this mid-air discussion

Bald Eagle, Washington (5125)

4.  In June I made another trip to San Juan Island for some kayaking and while there I got this nice image of the Lime Kiln Lighthouse.

Lime Kiln Lighthouse, Washington (3027)

5.  Also in June I shot this beauty outside of our kitchen window! (Male Anna’s Hummingbird)

Anna's Hummingbird, Washington (1564)

For the next 3 images I had to go a bit futher afield.  We spent a glorious 10 days at the Masai Mara Game Reserve in Kenya in September.  I had lived in Kenya many years ago and it had been 15 years since I had visited Masai Mara.  There is still no place like it on the planet to see big cats.

6.  I love this unique photo –  we had 12 giraffe walk past us at sunset.  They got all bunched up as a family of cheetahs was sitting nearby and the giraffes were watching them closely.  In this image the sun had fallen below the horizon and we were left with just shades of blue.

Giraffe, Kenya (8929)

7.  We spent alot of time with this mother cheetah during our trip.  She was one of the most powerful cheetahs I have ever seen and exuded confidence.  In this image she is waiting out a heavy rainstorm.

Cheetah, Kenya (8582)

8.  We had tremendous luck in spotting leopards on our trip — during our stay we found 3 females with a cub (so that is 6 leopards in total).  In this image we see a mother leopard playing with her cub just after sunrise.

Leopard, Kenya (5069)

The last two images are from the Grand Teton National Park – I spent 10 days there in December.

9.  In this image I slowed down the shutter speed to highlight the falling snow and give a sense of the conditions that moose endure during the winter here.

Moose, Wyoming (9346)

10.  In this image a unique view of moose with some beautiful side light.

Moose, Wyoming (0366)


Let me know your favorite in the comments below.


Hope you have a wonderful 2022!


michael


Bright Bird

Shot of the Month – December 2021

Crow, Wyoming (2956)

Capturing a good image of an all black bird is quite tough.  Exposing properly to bring out the detail in the black feathers usually leaves the rest of the image overexposed.  This image of a crow, captured in Wyoming, is one of the few times the lighting worked out.

I love the simplicity of the composition and the basic “primary” colors in this scene — simple but bold blue, black, and white.  Of course these are not true primary colors –  as we know from elementary school the three primary colors are red, yellow, and blue.  But I think you get my drift.

I have to also note that I am only about 90% confident that this is a crow, which is a member of the Corvidae family.  Also in this family is the Raven which looks very similar though ravens are usually larger, sound a bit different, and have a few other different physical traits.  Here is a good video that highlights the key differences and clues on how to identify a Crow from a Raven.

Given the shorter, even-shaped bill, I am going with crow for my image.

As you may have heard, crows are incredibly intelligent and one of the few animals able to use tools.  Watch the video below, it is one of my all-time favorites as it clearly demonstrates the mind- boggling problem-solving skills of crows.


There you have it – a bright image of a very bright bird.


Until next month….


Nikon D4S, Nikon 200-400mm (@400mm), f/8, 1/1500 sec, ISO 400, -0.667 EV

Wing It

Shot of the Month – November 2021

Ruby-throated Hummingbird (5075) - Vermont

This month a dash of color to help counter the winter doldrums – here we see a lovely female Ruby-throated Hummingbird investigating the flowering Liatris Spicata (Blazing Star) plant.

You will notice that the wings off the hummingbird are blurred in my images.  I actually like this look as it acurately reflects how we see hummingbirds with our eyes.  And it adds to the “fairy” look – And what is more fairy-esque than these wee flying wonders?

Ruby-throated Hummingbird (5086) - Vermont

Hummingbirds are tremendous flyers and can fly horizontally, backwards, vertically and can hover –  the smaller the hummingbird the faster the wing beat to keep them aloft.  The Ruby-throated humming bird shown here beats her wings about 50 times each second.  A rufous humminbird’s wing beat is about 52-62 wingbeats per second.  The giant hummingbird of the Andes (about the size of a Cardinal!!) has a wingbeat of just 12 beats/second.  The tiny bee hummingbird of Cuba, the smallest bird on earth at just two inches in length, beats its wings 80 times per second. (Source)

Capturing an image of a hummingbird with the wings motionless is possible but requires a very fast shutter speed or the use of one or more flashes.  Some photographers are quite adament about taking images of hummingbirds with the wings motionless and will go so far as to create mini “studios” to make it possible.  In these setups one puts a feeder on a table or hangs it from a stand, sometimes amongst or behind flowers.  From here you surround the area with 4 to 5 flashes set to expose the scene so quickly that the wing motion appears static.  Sometimes a painted backdrop is added to ensure that the background color is just right.  Quite a bit of tinkering may be needed to deterime the proper location of each flash to ensure that the scene is properly lit.  You also need to spend some time to dial in the appropriate power output of each flash to get the right exposure.  The feeder is essential to ensure that the hummingbird comes back to the exact same location for the specific lighting setup that you have created.  Here is an example of one home setup:

In countries where hummingbirds are plentyful, say Costa Rica or Ecuador, you can actually book a photo tour where the guides will create elaborate hummingbird setups  –  all you have to do is show up, connect your camera to the flashes and snap away.

It’s all a bit much for me – I am not quite that motivated to get the “perfect” shot of a hummingbird and prefer to take my chances in the “wild.”  In the images above I actually did use one flash but as you can see it didn’t do much to help stop the wing movement (I didn’t really know what I was doing).

Here we have a free range Anna’s Hummingbird that I shot with natural light in our garden:

Anna's Hummingbird (9879) - Washington

But hey, who I am to judge?  If you are passionate about hummingbird flash photography, go for it.  If you want more information on how to set up such a setup, look here:

Hummingbird Flash Set-up Guide

And here is a video of a guy that walks you through how he puts together his setup.

And here is an example of a hummingbird photo tour to Ecuador.


There you go – the ins and outs of hummingbird photography.  You can go hardcore studio lighting or you can just “wing” it, uh, so to speak.


Until next month…..m


Nikon 300S, Nikon 70-200mm f/2.8 (@ 200mm @ f/4), ISO 800 1/250 sec.