Black-shouldered Kite

Shot of the Month – May 2022

Black-shouldered Kite, Masai Mara - Kenya (6701)

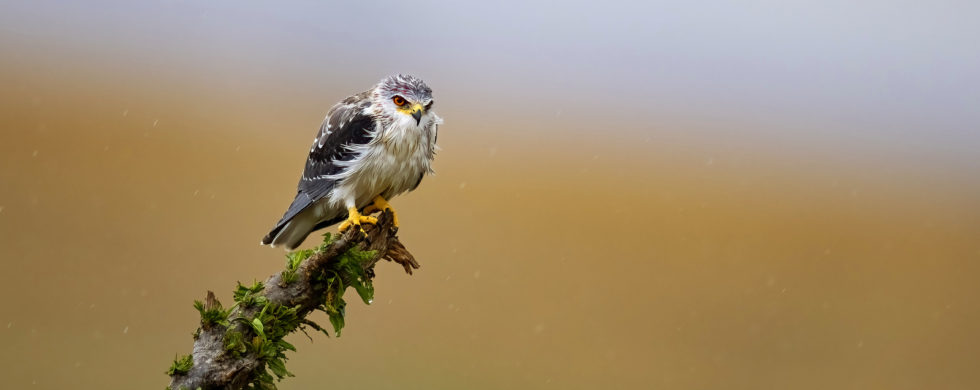
This month I share an image of a lovely Black-shouldered Kite (BSK).  I photographed this beauty during a downpour in Masai Mara NP in Kenya (if you look closely you can see the rain coming down).  The BSK gets its name from the dark shoulder patches on its wings and it is the contrast of those dark wings against the white underbelly that first caught my eye.  But as I looked more closely at this bird hunkered down in the rain, I noticed that the head and back are draped in exquisitely blended gradients of gray.  To add a bit more flair the BSK has striking yellow feet, a yellow beak, and dramatic red eyes.

Yes, I am smitten with this little raptor.

So let’s get our terminology in order.  A bird of prey is called a raptor.  A raptor is a bird that mainly uses its claws (talons) to seize prey.  But what makes a Kite a Kite?

For you science types, Kites are birds found in three subfamilies (Milvinae, Elaninae, and Perninae) of the family Accipitridae.  There are about 25 species of Kites found around the world.  Y-e-e-e-aaaah, that’s not super helpful – got anything else?

Here’s what I could find:

  • Kites, as a group tend to have weak legs so they like to spend most of their time in the air.  In flight, kites often flap their wings once and glide for long distances before flapping their wings again.  While gliding, the wings are tucked behind the bird to create minimal air resistance so the bird seems to float through the air.
  • Kites typically have long, narrow wings and tails.
  • Kites often have forked tails. (The BSK has a square tail, so there are exceptions)
  • Kites have small heads and short beaks.  The face of many kites is partly bare as many of them feed on carrion and the bare flesh makes cleanup easier.

The BSK prefers open land and semi-deserts in Sub-Saharan Africa and tropical Asia, and for some reason, they can also be found in Spain and Portugal.

This small raptor tends to dine on rodents, grasshoppers, crickets, lizards, and sometimes on injured birds, small snakes, and frogs.  The BSK is about 12-15 inches (30-36 cm) in length, with a 30-36 inch (76-91 cm) wingspan, and only weighs about 7-12 ounces (200-350 grams).

When hunting the BSK sometimes hovers over a field looking for prey (similar to what kingfishers do over water).  Other times the bird will fly slowly, close to the ground in search of a meal.  And yet other times the BSK will sit on a perch scanning the ground for prey – once spotted the bird will dive down to scoop up the unsuspecting victim.

As for the photo, as mentioned earlier, I love the look of this gorgeous raptor.  I shot with a wide-open aperture to cause the background to disappear into a quiet blur and allow the bird to really pop out of the image.

In the image above I zoomed in to create a nice portrait of just one BSK.  Actually, there were three birds sitting on a dead tree as they waited out the rain together (our portrait guy is on the right):

Black-shouldered Kite, Masai Mara - Kenya (1289)

The two birds on the left are flapping their wings to shake the rain off.

While in Kenya we spent most of our time focused on finding the big cats – lions, leopards, and cheetah.  And boy oh boy, we found a bunch of them.  We had amazing sightings of said cats every day.  And despite all that I have to say that sitting with this wee raptor, as the rain gently plopped, plopped, plopped on the canvas roof of our land cruiser, is still one of my favorite memories from the entire trip.  I had never seen a BSK up close before (via my powerful lens) and it was a wonderful revelation.


Until next month….michael


Here is a fun video of a Black-shouldered Kite hovering (watch how the head barely moves!)


Sources:

Wikipedia

The Peregrine Fund

Animals Wiki

All Things Nature (What is the Bird called a Kite?)


Nikon D500, Nikon 600mm, f/4, 1/1000 sec, ISO 1100, EV +1.0

Back for the Drama

Shot of the Month – April 2022

While living in Vermont I spent many a summer weekend morning in my kayak searching for Atlantic Loons.  This meant getting out of bed very early and driving for 1 to 2 hours in the dark to one of several nearby lakes to ensure that my kayak hit the water before sunrise.  If it all worked out well I would be able to photograph the loons in the golden light just after sunrise.   Occasionally, it all came together:

Atlantic Loon with chicks (7317)

Click here for the backstory on the image above.

One day I reached the lake early and began paddling out into the fog to look for loons.  As the rising sun started to burn off the fog I could finally make out a loon in the distance.  I saw that the bird was swimming to the farthest bank.

Oh no!!

I knew that this meant that he was planning to fly off to another lake.  He was “taxiing” to the far bank to get enough space for take off.  Loons are heavy birds and need a long “runway” to build up the speed for flight.  Check out my post Looner Flight – No Small Feat for more on the wonders of the Atlantic Loon (aka Common Loon).

I started paddling furiously.  I was looking directly into the sun and I wanted to get to the other side of the loon before he took off so I could photograph him with the sun behind me so the bird would be front-lit.

Too late!

The loon started to flap his wings and began his sprint.  I put my paddle down, grabbed my camera, and held down the shutter button.

Wildlife Photography from a Kayak (8011)

With the sun behind my subject, I wasn’t able to capture the rich colors I hoped for but the striking image below is an example of the magic that can happen when the subject is backlit.  In this case, the sun was behind the loon and produced wonderful highlights in the water as the bird skipped across the surface.  I love how his one foot is just kissing the surface of the water.

Atlantic Loon (9604), Vermont

Backlighting allows us to highlight the shape of an animal or explore dramatic light and shadows in a scene.  The lighting in the image below allows us to easily make out a moose walking along a ridge line in the Grand Teton NP.

Moose Silhouette (3619)

In the next image, the backlit grass seems to radiate from within.  The dust adds drama and highlights the form of the bison (Grand Teton NP).

Bison (6909)

Backlighting can create a dramatic rim light on an animal and highlight their fur or feathers as we can see with the moose below.  The backlit plants in this image also add drama to the scene.  On this cold morning, the moose’s breath is also backlit. (Grand Teton NP)

Moose (3154)

Leaves are a natural candidate for backlighting.  Here we have a cathedral of color from these backlit Vermont trees:

Cathedral of Color (6228)

Getting the exposure correct on a backlit subject can be tricky so you will definitely need to experiment with your settings to create the effect you are striving for.  Despite the challenges, shooting into the light, with the sun behind your subject, is a great way to create dramatic images that stand out from the crowd and capture the beauty of nature in a, uh, well, different light.

Until next month…..michael


Here are some good articles on tackling backlighting:

Backlighting in Wildlife Photography: Creative Use of Light

Backlighting Wildlife

Master backlighting with your wildlife images


Nikon D4S, Nikon 600 mm f/4, 1/8000 sec, ISO 640, EV -0.5


Painted Hills

Shot of the Month – March 2022

Painted Hills, Oregon (0035)

Travel to the high desert of Eastern Oregon and you can gaze in wonder at the Painted Hills as shown in the image above.  These mellow, albeit colorful hills are a time capsule of a tumultuous past that is hard to fathom.  Believe it or not, this place was once a tropical forest that was thick with vegetation, palm trees, bananas, and avocados.  The area would get 80 inches of rain per year — this desert now only receives about 15 inches of moisture a year, mostly in the form of snow.

But I am getting ahead of myself.  Let’s start at the beginning — waaaay back.  This epic tale began 35 million years ago when massive volcano eruptions in the Cascade Mountains, a hundred miles to the west, blanketed this area with ash and pumice.  Over time the ash and sediments were mixed by natural processes including the flow of water, growth of plants, and the movement of animals.  The surface ash was oxidized over the passing eons.  Buried under new layers and deposits, the ash turned into soils by way of compaction and cementation. With more time and weathering, the exterior surfaces of The Painted Hills were worn into clay. Now, they are primarily made of hard claystone layers.

Over the millions of years since those first eruptions, the area has experienced wild shifts in climate.  Millions of years ago this space was home to weather more like Costa Rica – the tropical forests I mentioned earlier.    Over time the climate shifted again and the area became a grassland with oak and maple trees.  Those stunning colorful red, yellow, and black stratifications in the hills above are a signpost of each different climate reality.

The red stripes are laterite soil that was formed by floodplain deposits when the area was warm and humid.  The darker black soil is lignite which was vegetative matter that grew along the floodplain.  The yellow soils were formed during dryer, cooler climates.  With each new climate, the landscape dramatically changed bringing different types of vegetation, water levels, temperatures, and animal life.  Areas near the Painted Hills are rich with fossils from plants and animals – one can find fossils of saber-toothed cats, early horses, camels, and rhinoceroses to name just a few.

Standing on this quiet overlook, it is hard to comprehend the scale and breadth of the cataclysmic changes this land has seen.

Painted Hills, Oregon (00341)


Painted Hills, Oregon (0341c)


Painted Hills, Oregon (070)


Painted Hills, Oregon (034c)


These hills strike me as a powerful reminder that when we meet a hill, or a person, what we see today does not tell their entire story – they may have had a past, and may have a future, that is wildly different from today’s snapshot.   Likewise, we can only imagine what they may have endured, for better or worse, to reach their current state.


Until next month…


Sources

If you want to photograph the Painted Hills here are a few good guides:

Photograph Oregon

Photograph the Painted Hills

Outdoor Photographer

Here is a great overview on visiting the Painted Hills:  Painted Hills of Oregon: Everything You Need To Know

Another guide: Exploring Painted Hills, Oregon

Another good guide:  A Stunning Guide to Oregon’s Painted Hills


Nikon D850, Nikon 24-120mm (@35mm), f/8, 1/90 sec, ISO 64

Feeling a Little Blue

Shot of the Month – February 2022

If you have any nature photographer friends you may have heard them talk wistfully about the “Golden Hour.” It is that special time of day just after sunrise or just before sunset when the light takes on magical hues of red, orange, or yellow and has a certain softness that seems to gently caress whatever it falls upon.  During “Magic Hour” the sun is low in the sky, only a few degrees from the horizon.

The lesser-known cousin of Golden Hour is Blue Hour.  I kid you not – it really is a thing.  To explain it I have to get a bit astronomical-like, so strap in.  And, uh, bring along your protractor…

At its simplest, Blue Hour takes place during twilight.  I have heard this term my whole life but what exactly does it mean??

Twilight is the time between day and night when there is light outside, but the sun is below the horizon.  During this period the light we see does not come directly from the sun but rather is scattered and refracted from the upper atmosphere down to our eyes.


Now for the more complicated version.  Time to break out those protractors (And see, you thought that box in your attic from 3rd grade wouldn’t come in handy.  Tsk. Tsk.)

Astronomers were not satisfied with just one “twilight” and created a more precise delineation as shown here:


Let’s break it down.

Astronomical Twilight: The sun is located 12 to 18 degrees below the horizon.  In astronomical twilight, sky illumination is so faint that most casual observers would regard the sky as fully dark, especially under urban or suburban light pollution.  During astronomical twilight, the horizon is not discernible, and moderately faint stars or planets can be observed with the naked eye under a non-light-polluted sky.  In the evening, when the sun is at 18 degrees below the horizon we have Dusk, the end of twilight, and the beginning of full evening darkness.  In the morning, when the sun is 18 degrees below the horizon, we have Dawn, marking the end of full darkness as we begin the morning twilight.

Nautical Twilight: The sun is 6 to 12 degrees below the horizon.  In general, the term nautical twilight refers to sailors being able to take reliable readings via well-known stars because the horizon is still visible, even under moonless conditions.

Civil Twilight:  The sun is located less than 6 degrees below the horizon.  Civil twilight is the period when enough natural light remains that artificial light is not (usually) needed.

Still with me?  You are probably thinking – “Ok Galileo, this is all mildly (barely) interesting, but where the heck does Blue Hour fit in all this?”

Here ya go:

Blue Hour takes place when the sun is between 4 to 6 degrees below the horizon which is usually about 30-40 minutes after sunset/before sunrise.  During this period the light takes on deep shades of blue and can produce unique images.  Truth be told the Blue Hour really only lasts about 20 minutes but the duration varies by where you are on the planet.

I like this graphic also (some may find this one clearer):

(Did you notice “Gloaming” in the graphic above?  It is just an Old English/Scottish term for twilight)

So that was a lot of blah blah to talk about the Blue Hour — more importantly, here is some of the magic it can work:

Blue Hour Giraffes, Masai Mara NR, Kenya (8929)

In this image we have a herd of giraffes strolling by shortly after the sun has set on the Serengeti plains of Africa (Masia Mara National Reserve in Kenya, to be precise).

Here is what the scene looked like while the sun was still above the horizon (late golden hour):


So, if you want to get your blue on you have to get out there waay early or stick around waay late, and then you have to work fast because blue time flies especially fast.


Now, don’t be blue, but we have reached the twilight of this post.


Until next month…..michael


Sources:

Weather.com

Wikipedia

Blue Hour

Lightartacademy

Different types of Twilight

Mr. Reid.org (dawn-dusk-sunrise-sunset-and twilight)


Nikon D4S, Nikon 200-400mm, f/4, 1/400 sec, ISO 2000, -0.5 EV

Pull Back!

Shot of the Month – January 2022

Moose, Grand Teton NP (9346)

Many photographers love to “fill the frame” when they photograph wildlife.  Many spend a tremendous amount of time, energy, and money to have the skills, equipment, and opportunities (photo tours) to allow them to get close to wildlife and capture an image that is filled from top-to-bottom, side-to-side with that fuzzy/furry/scaly natural wonder.  Photographers will spend thousands of dollars for the largest lenses to give them the extra reach to magnify their subject.

Yep, all sounds pretty familiar – you can lock me up for this also – guilty as charged.

Our offense is understandable – we love wildlife and such images allow us to see details that one can rarely see with the naked eye.  Such close-ups allow us to revel in the beauty of our subjects.

The downside is that you can go online and find thousands, and then many more thousands of images that look more or less the same.

To avoid this common mistake and get beyond the simple “animal portrait” when shooting I push myself to try and get at least 3 shots with different levels of zoom on the subject.  And if I have even more time I rotate the camera 90 degrees and take another 3 shots with different levels of magnification.  This can be achieved by either moving yourself (those boots were meant for walkin) or by using a zoom lens that can change focal length.

By pulling back I can place the animal in its environment or habitat and tell a more complete story about its life.  For example, in the image above I purposely did not zoom in to allow the viewer to see this brutal, albeit beautiful, winter landscape, because it is as important to the story as is the moose.   The wider view gives a sense of what life is like for a moose in the winter in the Grand Teton National Park (GTNP) in Wyoming.

Looking at that scene I can’t help but get a shiver down my spine.

Here is another one of my favorite images – by pulling back we see not only a magnificent bull moose but we also get to revel in the colorful bounty of fall in the GTNP.

Moose, Grand Teton NP (1666)

I rarely share images of moose without antlers (cows, young males, post-rut males) as they usually are not as photographically interesting.  In the image below however, the landscape adds so much to the story it becomes a keeper.

Moose, Grand Teton NP (3561)

So, don’t get me wrong, I love me a great close-up portrait.  My point is ok, once you get that shot, now keep going and explore what other stories can be told.  The “environmental portrait” is a wonderful way to broaden and deepen the story and connect the viewer to not only the animal but also to the place they call home.


Until next month….m


Nikon D5, Nikon 70-200 mm f/2.8 (@105 mm), f/5.6, 1/180 sec, ISO 140, EV +1.0