High Risk – High Reward

Shot of the Month – September 2020

Grizzly Bear with Elk, Yellowstone NP (8742)

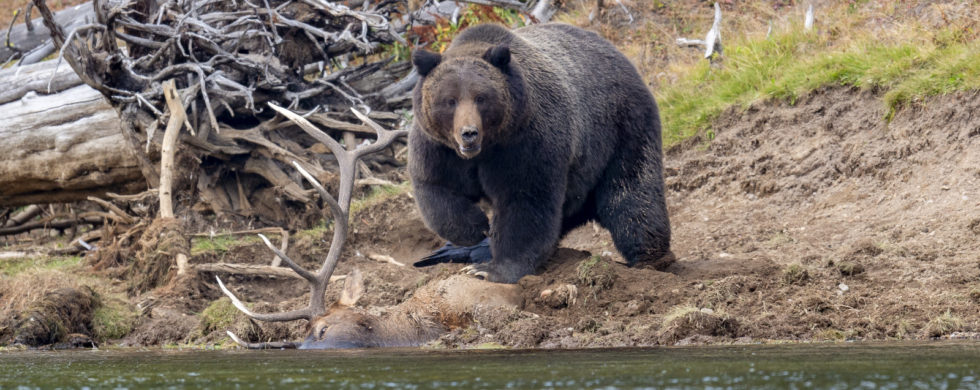
For eleven glorious days in September 2020, we explored the Grand Teton NP (GTNP).  The photo above was one of the best images from that trip, though, uh, it was actually taken in Yellowstone NP.  Say what?  Let me explain…

During our first four days in the GTNP, we had some wonderful sightings — moose, lots of moose, and bison, pronghorn, owls.  Fantastic stuff.

At different locations, we would invariably bump into other photographers and tourists.  People would talk about what they had seen and share information — we were all looking for the next hot tip on where to find something special.

On the fifth day, the chatter was abuzz about a grizzly bear that had killed an elk in Yellowstone.

“Did you hear about the Grizzly?

“No”

“Yeah, a woman got it all on video.  It is amazing.  The bear is still with the elk on the bank of the river.”

More and more chatter about the video that was on Facebook.  And then we would bump into people who had been there and seen the bear with the kill.  They said it was incredible.

The kill happened on a Friday.  We heard about it on a Saturday.  We (my partner Nicky and I) discussed…”Should we try and go up to Yellowstone to see the Grizzly…”?  We figured that a grizzly would finish the elk quickly so till we got up there he would probably be gone.  We stayed put.

Sunday, people are still talking about the grizzly…We discussed again:  “Should we go…”?  In the end, no.

Monday.  People are still talking about the grizzly.  “Yeah, the bear is still there…there is still lots of meat on the kill…”

We again pondered this “High Risk-High Reward situation.”

What made it high risk?

  1. We would arrive 4 days after the kill was made.  It seemed very unlikely that a grizzly would stay so long on a kill site — how much of a meal could be left to entice him to stay longer?  We could drive up to the site and find nothing.  The area between GTNP and Yellowstone is a dead zone for wildlife so there is not much to see otherwise.  Sure, we could wander around the lower part of Yellowstone and hope to see wildlife but the odds of seeing something good were low otherwise.
  2. It would take 2.5 hours to reach the kill site.  We heard that parking was very difficult so we would have to arrive early or we wouldn’t be able to park near the site and we would have to walk a long distance.  And as a photographer, I would want to arrive early to have the good morning light.  We would have to get up at 3:30 am to reach the nearest parking area by 6:30 am (just before sunrise).  This meant that we really should end our day early on Monday so we could get to bed early, costing us photo opportunities on that day.  Tuesday might be a complete wash.  We would most likely get back late on Tuesday making it difficult to get out early on Wednesday, and in general, leave us exhausted for 1-2 days.  So this high-risk “detour” could cost us 2-3 days of photography at GTNP.
  3. Would the light be any good at the location?  Backlit?
  4. Would we have access to the site?  In some settings, only a few photographers have the best, unobstructed angle for a good shot.

And the high reward part?  Well, getting to see a grizzly on a kill site is a once-in-a-lifetime opportunity.

What to do?  Getting a good photo out of this venture seemed very, very unlikely and would cost us a lot of time and degrade our ability to capture images in GTNP.  But, a grizzly, on a kill site….we had never had a good grizzly sighting before.

We pushed all of our chips into the center of the table and rolled the dice (Craps metaphor).  We got up at 3:30 am and drove the entire length of GTNP in the pitch black (this is nerve-racking as you never know when an animal might come out onto the road), through the border area between the parks, and then up through the southern part of Yellowstone to Hayden Valley.  We found the parking area and we tucked into the next-to-last spot!  We spoke to a few people and understood where to go.  We walked along the river and found a spot about 150 yards across from the grizzly.  Photographers were spread out along the river bank but there was plenty of space for everyone so it was not quite as crazy as it can be sometimes.

And then we waited.  The river was completely fogged in.  It took more than 2.5 hours for the fog to burn off before we could start capturing images.

Was it worth it?  Wow, was it!   Once the fog burned off we had a clear view of the grizzly.  The location of the bear on the river was near perfect and was well-lit in the morning and in the afternoon.  We spent 12 hours there taking it all in.

It was just an amazing experience to get an unobstructed view of a grizzly for such a long period and observe his behavior and the interactions between him and other wildlife as he fed and protected his kill.

So first, here is the video showing how the grizzly killed the elk.  September is the rut season for elk and this massive bull was in the prime of his life.  Unfortunately, the bull had broken his rear leg, most likely while sparring with another male.  The grizzly must have noticed this injury and took immediate chase.  Death was relatively quick as the bear drowned the elk in the river.

And in this video, you can see how much work the grizzly did to bury the elk to protect it from scavengers.

The bear’s day was comprised of digging up the carcass to feed and then burying the carcass to keep it safe.  Then digging it up…then burying it.  Digging…burying.  Dig.  Bury.  All day.  He was also relentless in his efforts to chase off any scavenger that might try and steal a morsel.  So many words…check out this fun video that Nicky captured.  It will give you a better sense of what our day was like:

Kind of hard to steal a bite when a 600 lb. grizzly is lying on the prize…

Grizzly Bear with Elk, Yellowstone NP (0568)

By burying the carcass next to the water the bear only had to defend in one direction.  In this scenario not even an entire pack of wolves would be able to budge this bruiser.  This one, plaintive-looking wolf is not a threat, and the bear never even bothered to growl or threaten the wolf as the balance of power was clear.

Grizzly Bear with Elk and Wolf, Yellowstone NP (0963)

We finally left to drive back to GTNP at 7 pm and made it to bed by midnight.  A 20+ hour day.  We were pretty shattered the next couple of days but the high from that dice roll will last a lifetime.

Grizzly Bear with Elk, Yellowstone NP (9469)


Until next month…..michael


Nikon D4S, Nikon 600mm,1.4x TC (effective 850 mm), f/5.6, 1/640 sec, ISO 1100

180° !

Shot of the Month – August 2020

Photographers love hitting the beach to capture, what they hope will be, an epic image of where land and sea collide.  Photographers on the East Coast of the US usually get up early to capture the sun rising on the horizon.  Dawn’s early light and whatnot.

Light chasers on the West Coast typically make it a late evening as they wait by the sea for the sun to paint the sky red as it glides into the ocean.

Having moved to Washington State I am now exploring West Coast seascapes — a new paradigm for this East Coast “kid.”

In September 2019 I made my first visit to the Oregon coast to photograph the shipwreck of the Peter Iredale.  You can read about that adventure here.  I visited the beach in the afternoon and captured these lovely images:


Shipwreck, Oregon (4397)


Shipwreck, Oregon (4442)


Shipwreck, Oregon (4532)

Standing with my back to the ocean the setting sun painted the rusting hull with a beautiful hue of red and pink light.

In August of 2020, I went back to the same beach but I only could visit the site in the morning.  Given that the sun would rise from the other side (the “land” side) the colors would be much more muted.  Would it be worth going?  Perhaps better to just sleep in?  In the end, I dragged myself out of bed at 4:30 am and made my way to the beach.  Grumble, grumble.  Voice in my head: “…you’re just wasting your time….”  Grumble, grumble.

Before the sun breached the horizon I captured this ok shot:

Shipwreck, Oregon (1678)

As the sun rose over the horizon I explored how the warm light moved down the ship’s hull:

Shipwreck, Oregon (0863)

Yawn. While accurate, not terribly compelling…

I continued to look down at my camera as I shot the changing light.  After a few minutes, I looked up and glanced behind the hull.

“Holy S*&T!”

I had totally NOT noticed that the sunbeams were now just high enough over the horizon to blast beams of light through the ship, casting dramatic shadows.  This caught me completely off guard.  I hadn’t even imagined such a scenario.  Frantic, I ran over to the other side of the ship and began to shoot into the sun.  I knew we had the potential for something really special with this scene.

For the next 20 minutes, I worked at a feverish pace to capture the changing light and shadows before they vanished….First some color versions:

1.Shipwreck, Oregon (1969)

2.Shipwreck, Oregon (1986)

3.Shipwreck, Oregon (1952)

The harsh light and dramatic setting are well suited for Black and White…

4.
Shipwreck, Oregon (1986-BW)

5.Shipwreck, Oregon (1952-BW)

6.Shipwreck, Oregon (2081-BW)


Which version do you like best? (#1?….#6?).  (I am leaning toward #4, myself)


So there you have it, another example of why you should always go out and see what Mother Nature has up her sleeve.

Conventional wisdom says,

West Coast Beach = afternoon shoot. (for the “ideal” shot)

But as we can see here, even a sunrise, on a West Coast beach, can offer a glorious scene when the conditions are right.

Shifting the sun 180° can create scenes that are as different as, well, night and day….which seems kinda obvious, now that I say it out loud.

Still caught me off guard though…

Shipwreck, Oregon (4532)Shipwreck, Oregon (4532)


Until next month…m


Image #4:  Nikon D850, Nikon 17-35mm (@ 35mm), f/22, 1/1000 sec, ISO 64, -1.0 EV

Fall Falls

Shot of the Month – July 2020

In October 2019 I made a quick, mid-week run down to Oregon (Portland is about 3 hours away) to work on my landscape photography skills.  I mainly shoot wildlife so I need all the practice I can get.  I had visited some of the waterfalls of the Columbia River Gorge in the summer and I wanted to see if autumn brought any interesting color to the compositions.  On this quick run, I only had Wednesday afternoon and Thursday morning to make images – not much time but my goal was to try and get at least one good photo from the trip. The falls can get quite busy on the weekends so I went down in the middle of the week to, hopefully, avoid the crowds.

Late Wednesday afternoon I hiked up to Ponytail Falls and found the place deserted.  Ahhh, heaven.  I could commune with nature and compose my shots in peace.  I consider the trip a booming success having created this image — not bad for a wildlife guy!

I had to shoot two images to get the entire scene in sharp focus.  In the first image, I focused on the rocks in the foreground (leaving most of the scene behind blurry) while in the second image, I focused on the rocks about 2/3rds back in the scene (which left the rocks in the foreground blurry).  By merging the sharp elements from the two images together we get one image that is sharp from front to back.

A great way to improve your landscape images is to ensure that you have a strong element in the foreground of the image.  In this case, I used the rock in the lower left corner to anchor the photo.  The key to a compelling image is depth and this image has multiple layers — the rocks in the foreground, then the stream, the rocks and bushes a bit further back, then the falling water, and finally the rocks of the cliff face.

Truth be told I did place the yellow maple leaf on the rock — it was lying just next to the rock but I positioned it on the rock for better viewing as it helps tell the story and it is visually compelling.  I tried positioning the leaf in multiple places and in various orientations.  In the end, this composition worked best –  I like how the leaf stem guides your eye into the rest of the image.  I had started with “stem down” but it all clicked when I rotated the leave around into the “stem up” orientation.  I also like how the yellow leaf mirrors the yellow leaves on the bush in the far back right portion of the scene.

Together, these elements convey “Falls in the Fall.”  Just what I was looking for…


Until next month…..m


Here are a few links with ideas on how to improve your landscape compositions:

Importance of Foreground Elements (Video)

5 Landscape Mistakes to Avoid (Video)

How to get a perfect foreground (Article)

Importance of foreground in landscape photography (Article)


Nikon D850, Nikon 17-35mm (@ 17mm), f/8.0, 1.5 sec, -0.5 EV, ISO 64

American Pygmy Kingfisher

Shot of the Month – June 2020

American Pygmy Kingfisher, Pantanal-Brazil (457)

Warning:  Objects on your screen may be smaller than they appear.

In this image, the American Pygmy Kingfisher (APK) appears to tower over us.  Fear not, we are not in danger.  The APK is the smallest of all kingfishers and is about 5 inches in length and tips the scales at a mere 18 grams (about the weight of 3 American quarters or about 1/2 an ounce).

The wee bird seems so large because I was floating underneath him in a boat at a close distance with a 400 mm lens when I captured the image.  I love this shot as the combination of side lighting and blurred background gives the image an other-worldly, mystical vibe.

APKs can be found in the lowlands of the American Tropics from southern Mexico to central Brazil.  They are most commonly seen along small woodland streams, pools, puddles, and small channels in mangroves.  You can see their full range here.  I photographed this fellow in the Pantanal in Brazil.

The head and wings of the APK are metallic green while its body and neck are deep orange-buff, shading to rich dark rufous on the breast, sides, and flanks.  The diminutive kingfisher sits by rivers and will dive headfirst into the water after small fish and tadpoles.  He will also dine on insects such as cockroaches, aquatic beetles, and larvae.

Chillin by the river:

American Pygmy Kingfisher, Pantanal-Brazil (1305)

Scanning the water below…

American Pygmy Kingfisher, Pantanal-Brazil (1086)

Uh, too close!

American Pygmy Kingfisher, Pantanal-Brazil (1164)


Smallest of kingfishers = Largest of smiles


Until next month….m


Nikon D500, Nikon 200-400mm (@400mm), f/4, ISO 160, +0.5 EV


Source:

Wikipedia

Beauty of Birds

Exotic Birds.Life

My Animals

Green Kingfisher

Shot of the Month – May 2020

Green Kingfisher, Pantanal (1059)

On our first trip to the Pantanal in 2017 we learned that this incredible ecosystem was home to five types of kingfishers.  I am a sucker for bold colors so I was hopeful that I might capture a few on “film.”  While I was hopeful I was not optimistic, as most kingfishers are tiny and skittish making it very difficult to capture a good image.  Seems that they do things differently in the Pantanal.  On our first day on the water, during a three-hour boat trip on the Pixaim River we saw ALL five species.  And even better, the birds often took no notice of us as we drifted by as they scanned the water below for fish.  On our second trip to the Pantanal in 2019 I captured the image above of a male Green Kingfisher (GK).  The female GK looks similar though she does not have the rufous colored chest feathers.

Small fish are the mainstay of his diet so you can usually find the GK perched on a low-hanging branch near the water’s edge as the bird looks for fish that swim near the surface.  Aquatic insects are also on the menu.

Target acquired, Dive!

Green Kingfisher, Pantanal (0868)

Target missed!  Time to shake it off and get back in the game.

Green Kingfisher, Pantanal (0998)

The Green Kingfisher can be found from Southern Texas through most of Central and South America.  Their numbers are dropping in Texas due to loss of habitat but they are still plentiful further south.  To raise their young GKs build a horizontal tunnel into the side of the river bank.  The tunnel is about three long and about two inches wide.  (Two inches wide – that gives you a sense of how small these birds are)


This kingfisher, Chloroceryle americana, for you science types, is a real beauty and surely leaves the other birds green with envy.


Until next month…..m


Sources:

Wikipedia (Green Kingfisher)

Audubon

ebird

whatbird.com


Nikon D4S, Nikon 600mm, f/4, 1/1000 sec, ISO 720 (Shot in Manual Mode with Auto ISO)